Philips Support
Published on 08 July 2024
If your nose trimmer is not working, the troubleshooting tips below may help you find a solution.
We recommend you follow the steps in the order listed below. In between steps, check to see if the issue is resolved before moving to the next. Alternatively, you can watch the video below to solve the issue.
- Nose trimmers are built with a protective guard, such as the models with a cutting element on each side, ensuring the blades will not be in direct contact with the skin. The protection guard leaves short stubs of hair. It gives you a clean look without the risk of cuts, ingrown hairs, or hair pulling.
Insert the trimmer into your nose. Rotate the trimming head to catch the hairs growing in different directions. Do not insert the trimming head too far into your nostrils. For heads with a rotary tip, insert it about 5 mm. For trimming heads with a linear tip, insert it approximately 12 mm. While rotating, you may hold the flat side of the trimmer against the skin to reduce any tickling effect.
Always attach the eyebrow comb to the trimming head when trimming your eyebrows. The comb allows you to cut the hair to the desired hair length.
-
Your Philips Nose Trimmer could stop working once the battery has run out. To confirm this, perform the following actions: - Switch off your nose trimmer.
- Detach the trimming head and switch on the trimmer.
- Is the motor running and pin rotating, then both the battery and handle are okay. If not, the battery of the trimmer has run out.
- Reattach the head to the trimmer and recharge the nose trimmer.
- Rechargeable products: While charging your trimmer make sure you use the original charger that comes with your device. For further charging instructions, please refer to the user manual.
- For nose trimmers with disposable batteries, please see further instructions below.
-
If you own a nose trimmer which runs on disposable AA batteries, it is possible that it is time to replace them. To solve this issue simply replace the battery with a new one. When replacing the battery, make sure that the + and - poles of the battery point in the right direction. This is indicated on the battery compartment. -
If you have confirmed that your Philips Nose Trimmer has a full battery and it is still not working, then it may not be working because it is dirty and the cutting unit is blocked. We advise that you clean your nose trimmer after each use for optimal performance. Follow our cleaning advice below:
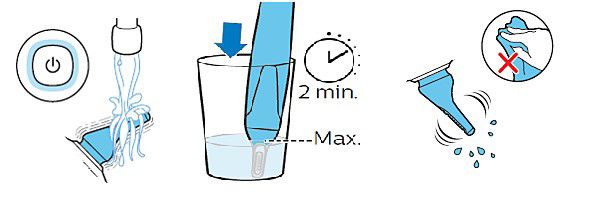
- Rinse the trimming head of the nose trimmer with lukewarm water. Switch on your nose trimmer after 15 seconds and switch off the appliance again after 5 seconds. Retry a few times.
- If rinsing the trimming head under the tap is not sufficient, immerse the trimming head in a glass of warm water for a few minutes. Do not put the handle of the trimmer in the water, as this can damage its internal machinery. Repeat step 1 again.
- If this does not help, detach the nose trimmer attachment and soak this part separately in water for 30 minutes. Reattach and repeat step 1 again.
- If the trimmer is operable again: carefully shake off excess water and let the trimmer air dry.
- For best results, clean your nose trimmer after each use and lubricate the trimming head with a drop of the oil provided or sewing machine oil regularly.
-
If none of these tips help, your Nose Trimmer may be damaged internally. We recommend that you request a repair or exchange for your Nose Trimmer.


